Saturday, December 25, 2021

Merry Christmas!

 Saturday, December 25, 2021

Merry Christmas from my family to yours!


Steven & McKenzie
Jerry and I with our dog, Jake
Katie and Taylor with their dog, Bonnie


The angel said to them (the shepherds), "Do not be afraid. I bring you good news of great joy that will be for all the people. Today in the town of David a Savior has been born to you; he is Christ the Lord.  
Luke 2:10-11

Celebrating the birth of our Savior, Jesus!
Tracy


Friday, December 24, 2021

It's Fri-yay!

 Fri-yay! December 24, 2021

It's Fri-yay! Today's post highlights Stampin' Up!'s current Paper Pumpkin promotion.


Here is the link to the video featuring Kisses and Hugs by Paper Pumpkin: https://youtu.be/0qJGKUFSxdA


I'm sure this kit is going to be adorable. Here are the details:

Name: Kisses & Hugs

Details:

  • Kit contains enough supplies to create 10 cards—5 each of 2 designs—and 10 coordinating envelopes
  • Kit features an exclusive Two-Step photopolymer stamp set
  • Kit includes a Gray Granite Classic Stampin’ Spot
  • Card size: 4-1/2" x 4-1/4" (11.4 x 10.8 cm) heart-shaped cards; folded
  • Coordinating colors: Blushing Bride, Flirty Flamingo, Gray Granite, Very Vanilla

ADD-ON


Name: Kisses & Hugs Mini Treat Boxes 

Item number: 160147 | $10.00 USD | $13.75 CAD

Details:

  • Contains 20 mini treat boxes and 20 heart tags
  • Gold cord: 10-1/2" yards (9.6 m)
  • Finished size: 1-3/4" x 1-3/4" x 1-3/4" (4.4 x 4.4 x 4.4 cm)
  • Printed with gold foil

These coordinated treat boxes are not included in this month’s kit and are only available for purchase separately as an add-on online starting 25 January. You must be a Paper Pumpkin subscriber to purchase and they are only available while supplies last.


Sounds pretty special! If you are interested in a subscription you can find all the information here:  https://www.paperpumpkin.com/en-us/sign-up/?demoid=2208670

Happy Stamping, my friends!

Tracy

Thursday, December 23, 2021

Let's Celebrate You!

 Thursday, December 23, 2021

I've been wanting to use this stamp from Stampin' Up!'s Seasons of Fun! I hadn't inked it up yet. This stamp set will be retiring on January 3, 2022 but it will remain in my collection. I love it! I love cute and whimsy! I made this card for my friend who has lost an incredible amount of weight this year. I am so proud of her. We usually walk together once a week...with our dogs. I think she will like the card!


I am entering it in the Global Design Project #323:


I'm also sharing a photo of our Christmas tree at The Card Concept. There's a very sweet little gift under it:


This is our granddog, Bonnie. She is a gem. She came in and went straight for the quilt under the tree. That quilt was made by my great grandma a very long time ago! It is all hand sewn together. Just pieces stitched together. Lots of corduroy and a piece of veleteen. I remember as a child I enjoyed feeling the different textures. Most of my ornaments on the tree this year are handmade treasures from friends and family. Aren't those the best ones?!

Happy Stamping!

Tracy


Wednesday, December 22, 2021

Scrapbooking!

 Wednesday, December 22, 2021

Today's project is a scrapbook page! My papercrafting journey began with scrapbooking and evolved over time to include cards and 3D projects. I have been working on an album for our son, Taylor, and his wife, Katie. They were married in May and had a bunch of photos displayed at the wedding. I offered to put them in an album and Katie and I keep adding things to it!


I wanted to use this piece of DSP from the Blackberry Beauty DSP. I added elements from the Blackberry Beauty Ephemera Pack. It's okay. I'm not sure what I was expecting. LOL! I might add a something else to these pages...I just don't know what! Sometimes scrapbooking is like that. Looking back on all the pages and albums I've done over the years it isn't the page layouts that we care about it is the pictures and the stories that we are interested in! That's so important to remember. (preaching to self right now!)

I hope all your holiday preparations are going well. Remember to take pictures while you are making the memories and enjoy!

Happy Stamping!

Tracy

Tuesday, December 21, 2021

A Polished Pink Window Box

Tuesday, December 21, 2021

Today's project is a sweet window box. This was a fun and fairly quick box to make. I followed the video tutorial that Stamping with Amore did here:  https://youtu.be/YmUVwrQAb0k.


I kept my box simple and didn't add the cover that is demonstrated in the video. I like it this way. Sadly, I didn't have any chocolate bars or Ghiradelli chocolate squares to add to my box! 

Project Details:

  • Polished Pink cardstock 6-1/2" x 8-1/4" Score on the 8-/14" side at: 3/8"; 7/8"; 7-3/8"; 7-7/8". Score on the 6-1/2" side at: 2-1/2"; 3"; 5-1/2"; 6". Cut and burnish score lines per the video directions.
  • Blackberry Beauty DSP: 2-3/8" x 6-3/8" Adhere to front.  Using the Stitched Rectangle die (1-7/8" x 3-3/4") cut the window.  Adhere a piece of Window Sheet cut at 2-1/4" x 5" to the back side.
  • Glue your box together.
  • I added some pieces from the Blackberry Beauty Ephemera pack. So pretty! I used some retired Rich Razzleberry ribbon and made a little bow which I adhere with a glue dot.
I hope you'll give this project a try. I just might make a few more for Valentine's Day! I have some ideas floating through my mind...

I hope your holiday preparations or events are going well. Remember to breathe and, most importantly, enjoy every minute!

Happy Stamping!
Tracy


Monday, December 20, 2021

Blackberry Beauty

 Monday, December 20, 2021

Happy Monday, my friends! This week my I am featuring the Beauty of Tomorrow bundle and coordinating products. This product bundle is available in the July-December Mini Catalog until January 3, 2022.


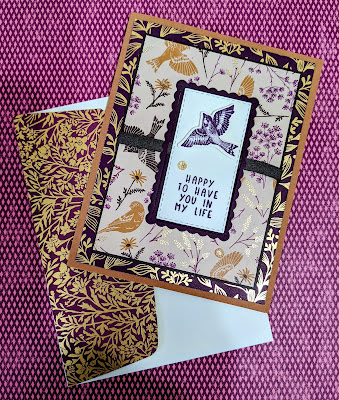
Today's cards use the Blackberry Beauty Designer Series Paper. This paper is pretty bold. I enjoyed mixing and matching the various prints and designs along with the coordinating cardstock. I love how easy Stampin' Up! makes it to select colors!


Each of these cards share the same tutorial I just switched up the colors.

Project Details:

  • A2 card bases in Blackberry Bliss, Early Espresso and Cinnamon Cider
  • DSP:  4" x 5-1/4" and 3-3/8" x 4-5/8"
  • 3-1/2" x  4-3/4" cardstock in Blackberry Bliss and Early Espresso. Cut out the second smallest scalloped rectangle die from the Scalloped Contours dies.
  • Using the Stitched Rectangle dies cut a rectangle from a scrap of Very Vanilla to fit in the scalloped rectangle. Stamp the sentiment on this piece. I used sentiments from Peaceful Moments, Color and Contour and the not-yet-available Sweet Conversations!
  • On a scrap of Very Vanilla stamp the bird and cut out with the Beautiful Leaves dies.
  • Adhere the DSP and cardstock together as shown. Wrap a piece of ribbon around all. The ribbon will slide through the scalloped rectangle as there are slots in each side. I used the 3/8" Gold Shimmer ribbon, the Faux Suede Ribbon in Early Espresson and the Blackberry Bliss ribbon from the August 2021 Paper Pumpkin
  • Add gems to the front. I used the Brushed Metallic Dots and the Genial Gems
  • I finished the envelopes by gluing a piece of DSP to the flap.
I enjoy making multiples of a card and switching up the colors or sentiments.

Yesterday we had Christmas at my mom's house. It went really well. Of course not everyone could make it but those that did we enjoyed! Here's our group photo:


Ha! I just realized we should have taken Lucy out of her crate for the photo! She's the naughty Yorkshire Terrier that goes ballistic with this many people in her territory! 

Happy Stamping!
Tracy

Thursday, December 9, 2021

Beauty of Tomorrow

Thursday, December 9, 2021

Today's project uses the Beauty of Tomorrow Bundle that, I think, has been sadly overlooked in the Holiday Mini Catalog. The bundle includes the stamp set Beauty of Tomorrow and the Beautiful Leaves dies.


I decorated the front of a small kraft bag.  You can get these at most craft stores. 

Project Details:

  • Cut the largest leaf die from Highland Heather cardstock. Adhere to bag using Multipurpose Liquid Glue.
  • Stamp the sentiment in Memento Tuxedo Black Ink onto Crumb Cake cardstock. Cut using the Stitched Rectangle dies. Adhere to bag with dimensionals.
  • Stamp the bird in Memento Tuxedo Black Ink onto Gorgeous Grape cardstock. Cut uisng the Beautiful Leaves dies. Such a cute little bird! Adhere with glue on the edge of the sentiment. You can add a mini dimensional to the bird's tail if you want.
That's it! You can fill this bag with a variety of fun gifts! Use colors that fit the ocassion! 

Happy Stamping!
Tracy