Saturday, July 31, 2021

Christmas in July!

 Saturday, July 31, 2021

I had to sneak one 'Christmas in July' card in before the calendar turns!


I used the Peaceful Prints Designer Series Paper. It will be available beginning Tuesday, August 3, 2021 as a SALE-a-bration item. The July-December Mini Catalog will also be available beginning that same day! Lots of fun products coming!

Card Tutorial:
  • A2 card base in Cherry Cobbler
  • Basic Black 3-1/8" x 4-1/2
  • DSP: 2" x 2-5/8"; 2" x 1-1/2"; 3/4" x 4-1/4"; glue onto black cardstock
  • Sentiment from For Unto Us stamp set; stamp in Memento Black in onto Basic White cardstock; cut using the Tasteful Labels dies
  • Mount with dimensionsals
  • Holiday Rhinestone Jewels
Happy Stamping!
Tracy

Thursday, July 29, 2021

One Daisy Lane

Thursday, July 29, 2021

Today's card is a very quick and cute card using the Daisy Lane stamp set, Medium Daisy Punch and the In Good Taste Designer Series Paper.


I'm entering it in the Global Design Project sketch challenge here. I flipped the sketch to portrait.


Card Tutorial:
  • Basic Black card base 5-1/2" x 8-1/2" scored at 4-1/4"
  • Cut 1/2" x 4" strips of DSP; glue to card base
  • Cut 1/2" x 4" strip of Magenta Madness cardstock; glue to card base
  • Stamp 2 medium daisies in Magenta Madness; punch out using the Medium Daisy Punch; glue daisies together; adhere to card base using a dimensional
  • Sentiment is from Many Messages stamp set and cut with coordinating die; adhere with mini dimensionals
  • Adhere 3 mini Gilded Gems to the center of the daisy
Happy Stamping!
Tracy


Wednesday, July 28, 2021

Keep Calm and Wag On!

 Wednesday, July 28, 2021

There's a story behind today's card.


And I'm entering it in the Retro Rubber Challenge #163. I am doing the middle row: Embossing, Green, Wood. 


I've been doing doggie daycare for Bubba. Isn't he a cutie?!
 

Well, last week when I took the Farmer to the doctor and then to ER and then the whole appendectomy thing happened...Bubba was chewing through his rope that held him. When we got to ER I knew I needed someone to check on the dogs. I was trying to contact a friend but I wasn't able to make a connection with her. Then about the time I was going to contact someone else I got a phone call saying Bubba had been loose! I was so upset. I felt horrible. I believe in angels. There was one driving by on our road when Bubba was loose. She picked him up. She ended up keeping Bubba for the rest of the day. Bubba's owner said there could not have been a better person/place for him that day. Makes me cry just thinking about it again. Apparently Bubba is a bit of an escape artist. He has had other "events" shall we say. He is seven years old and is still keeping his owner on his toes! I am keeping close tabs on Bubba! So, this card is going to Bubba's guardian angel as a thank you!

Card Tutorial:
  • Basic White A2 card base
  • 4" x 5-1/4" In Good Taste DSP; glue to card base
  • Garden Green cut using Stitched Rectangle die; embossed with a Darice paw print EF
  • Basic White cut using Stitched Retangle die
  • Stampin' Up Happy Tails Stamp set (retired 2020) and dog punch
  • Stamp dog and sentiment using Memento Black Ink; I used the Light Basic Black Stampin' Blend to color a bit more of the dog to resemble Bubba
  • Punch a Poppy Parade heart using the Dog Punch 
  • I used some retired striped Garden Green baker's twine and adhere the rectangles using dimensionals.
Happy Stamping!
Tracy


Tuesday, July 27, 2021

Bright Daisies!

 Tuesday, July 27, 2021    

This week I am showcasing the Daisy Lane stamp set, Daisy Punch and the Medium Daisy Punch along with the In Good Taste Designer Series Paper which happens to be 15% off through August 2, 2021.


I demonstrated today's card on my FB live. Click here to watch the replay.

Card tutorial:

  • 5-1/2" x 8-1/2" score at 4-1/4"
  • In Good Taste DSP 4" x 5-1/4"
  • Faux Linen Ribbon from the Flowers for Every Season Ribbon Combo Pack
  • Adhere ribbon to DSP; glue to card base
  • Stamp 1 each of the medium Daisy in: Bermuda Bay, Mango Melody, Magenta Madness; punch out using the Medium Daisy Punch
  • Stamp 2 of each of the large Daisy in the same colors; punch out using the Daisy Punch
  • Adhere 2 large daises together and 1 medium daisy in each color
  • Adhere to card base
  • Adhere your sentiment using dimensionsals. This sentiment is from Many Messages stamp set.
  • Adhere 3 Brushed Metallic Dots to the card front
Enjoy and Happy Stamping!
Tracy

Sunday, July 25, 2021

Its Been a Week!

 Sunday, July 25, 2021

Well, the week has wound down and a new week awaits! Do you see Sunday as the end of the week or the beginning??? 

I wanted to share one more card using the Dragonfly Garden Bundle.


Card tutorial:

  • Balmy Blue card base 4-1/4" x 11 score at 5-1/2"
  • Stamp the butterflies (or are they dragonflies) all over the card base using Fresh Fresia
  • Cut a tag using the largest die from the Hippo & Friends dies
  • Stamp the wildflowers using Memento Black ink
  • Cut the sentiment tag using the smallest die from Hippo & Friends; stamp the sentiment using Memento Black ink
  • Adhere both tags using dimensionals
  • Stamp the dragonfly using Memento Black ink; color using Fresh Fresia and Balmy Blue Stampin' Blends; the punch out using the small dragonfly! Such a clever idea! Adhere them with a glue dot
Here's a glimpse behind the scenes and in the life of Studio 1.15:


A week ago I was riding in the combine with the Farmer harvesting grass seed.

Hanging out at the hospital a few days later with the Farmer before his emergency appendectomy.


Doing doggie daycare for Bubba (Black and white dog) and loving on Jake (our dog) too!


Harvesting wheat. This is the field right by our house.


Keeping the creativity going in between life! Studio 1.15 was a Hot Mess this week! Hope you all had a great week! There is much to be grateful for!

Happy Stamping!

Tracy


Saturday, July 24, 2021

A Hand Penned Bag/Box

 Saturday, July 24, 2021

Today's project features the Hand Penned Designer Series Paper that is 15% off through August 2, 2021.


If you know me and are in my life on a regular basis you have probably received one of these boxes from me. They are one of my favs. So easy to make and they use a 6" x 12" piece of paper so that is a half sheet of 12" x 12" piece of paper which is awesome for using up any extra paper you may have. AND you can fit a lot of little sweeties into this box! I followed the tutorial from Sam Donaldson at Pootles here

I used the layering circle dies, the Dragonfly Garden stamp set and the Dragonflies punch to create the cute tag. I adhered it to the box using dimensionals. I closed the box with a couple small clothespins that I picked up at the store, probably Wal-Mart. SU! doesn't carry any right now. 

I hope you will try and make this project soon. Let me know how it goes.

Happy Stamping!
Tracy

Thursday, July 22, 2021

Dragonfly Garden

 Thursday, July 22, 2021

Today's card features the Dragonfly Garden Bundle which is a stampset and a coordinating punch. 


Super cute and super fun to play with. Here's the cute and quick card I made:


Card details:

  • Daffodil Delight card base 8-1/2" x 5-1/2" score at 4-1/4"
  • Hand Penned DSP 4" x 5-1/4"
  • Mint Macaron 1" x 4" Embossed with the Ornate Floral embossing folder
  • Piece of Highland Heather stamp a large dragonfly using Memento Black Ink; use Dragonflies punch to punch it and the smaller dragonflies out.
  • Basic White 3/4" x 3" stamp sentiment with Memento Black ink. Flag ends using scissors or the Banners Pick A Punch
I hope you enjoyed this project. 

Life on the farm is getting back to normal after The Farmer (my hubby) had an emergency appendectomy Monday afternoon. I could not hold him back any longer and he went off to work today. They have started combining the wheat and it is a very busy time. I'm praying he will be okay... 

Happy Stamping!
Tracy

Saturday, July 17, 2021

Hey, Friend!

 Saturday, July 17, 2021

One final card highlighting the In Symmetry bundle that I have featured this week:


I changed up the colors a bit. I used a piece of the DSP but went with a Polished Pink card base, flower, ribbon and jewels. I love this color combination!

Studio 1.15 Designs tutorial:
  • Card Base in Polished Pink: 5-1/2" x  8-1/2 scored at  4-1/4"
  • Sweet Symmetry DSP: 4" x  5-1/4"
  • Polished Pink Open Weave Ribbon enough to attach to the back of the DSP
  • Basic White cardstock: 2-1/2" x  3-1/2" stamp flower with Polished Pink; stem and leaves in Just Jade; sentiment in Night of Navy; adhere to a piece of
  • Polished Pink cardstock: 2-3/4" x  3-3/4" adhere to card using dimensionals

I hope you all have a wonderful weekend!
Happy Stamping!
Tracy


Thursday, July 15, 2021

It's a Bag!

 Thursday, July 15, 2021

I've been having so much fun using my Sweet Symmetry DSP that I made this bag that uses two sheets of 12 x 12 paper! It's a pretty big bag! So fun! I found the idea and tutorial here


Of course I had to use the In Symmetry stamp set and stamp another flower in Flirty Flamingo and Night of Navy to match the bag. I closed the bag using the Flirty Flamingo Gold Metallic ribbon. 

And this week I've been doing some doggy daycare! So much fun having Bubba with us!

Isn't he a beauty?! He and our dog, Jake, get along just fine! 

Happy Stamping!
Tracy


Wednesday, July 14, 2021

Stamps.Ink.Paper

 Wednesday, July 14, 2021

Today's card is a SIP card. Stamps. Ink. Paper. What do you think?

I am entering it in this week's Paper Player's color challenge:


Studio 1.15 Designs supplies:

  • Thick Basic white 5-1/2" x 8-1/2" 
  • In Symmetry; Color and Contour stamp sets
  • Bumblebee, Misty Moonlight and Just Jade ink pads
Happy Stamping!
Tracy

Tuesday, July 13, 2021

Sweet Symmetry

 Tuesday, July 13, 2021    

Seriously, how many things in life are symmetrical?! Not too many in my life! In nature?! Very rare. In mathmatics and in art I believe you can find symmetry. Today's card features the Sweet Symmetry Suite. The suite includes a photopolymer stamp set, the Symmetrical Stems Border Punch, the Sweet Symmetry Designer Series Paper, and the Flirty Flamingo Gold Metallic Ribbon.


I really like this suite! I am having so much fun with the color combination in the DSP: Flirty Flamingo, Calypso Coral, Just Jade. Bumblebee and Night of Navy. Maybe it is the symmetry, the balance in the DSP designs that makes me feel happy! 

Studio 1.15 Designs tutorial:

  • Card base: Just Jade 4-1/4" x 11" scored at 5-1/2"
  • DSP 4" x 5-1/4" wrap the ribbon around DSP before adhering to card base
  • Basic White 2-1/2" x 3" Stamp flower in Flirty Flamingo; Stamp stem and leaves in Just Jade; stamp the sentiment in Night of Navy; adhere to Bumblebee cardstock
  • Bumblebee 2-3/4" x 3-1/4"
  • Use dimensionals to adhere to card base
  • Punch stems in Night of Navy and Flirty Flamingo; adhere to card
An easy and fun card to make!

I made another one just a bit different:


I just flipped the DSP to the other side on this card and used a strip through the center. The flower is stamped in Calypso Coral; the stems and leaves in Just Jade. I used the Layering Circles dies. To finish the card I added three Brushed Metallic dots in gold. 

I hope you enjoyed these projects and have fun with the Sweet Symmetry suite yourself!

Happy Stamping!
Tracy

Saturday, July 10, 2021

Jar of Flowers

 Saturday, July 10, 2021

My final project this week highlighting the Jar of Flowers stamp set and the Jar Punch is a card.


I love this color combination! I used Polished Pink for the card base and Basic Black for the scallop rectangle. The jar is stamped with Gray Granite onto Gray Granite cardstock. I colored the flowers using SU!'s Blends in Dark and Light Polished Pink. For the greenery I used Light Soft Succulent and Dark and Light Soft Seafoam. I finished it with a few of the 2021-2023 In Color Jewels in Polished Pink. This was a very quick and easy card to make. 

Have a great weekend and Happy Stamping!
Tracy


Thursday, July 8, 2021

A Little Jar Box

 Thursday, July 8, 2021

Today I have some cute little boxes I made using the Jar of Flowers stamp set and the Jar punch.


One sheet of 8-1/2" x 11" piece of cardstock will cut out 8 boxes! I used Real Red cardstock and Night of Navy ink. I used the Many Messages stamp for my sentiments. I stamped them in Night of Navy.

Dimensions for the box:

Real Red Cardstock: 4-1/4" x 2-3/4"
Score on the 4-1/4" side at: 1", 2", 3", and 4"
Score on the 2-3/4" side at: 1-3/4"

Happy Stamping!
Tracy


Wednesday, July 7, 2021

The Free and the Brave

Wednesday, July 7, 2021

Five years ago on this day my dear friend, Krista, died. She fought bravely against ovarian cancer. I miss her.

 She is the one who introduced me to Stampin' Up! years ago. I was NOT a card maker. DID NOT want to make cards. I was a scrapbooker and did not have time for card making. No problem with Krista. She taught me how to use fun alphabet stamp sets in my scrapbooking. She taught me how to make my own background paper, how to use cute stamps on pages, etc....And slowly eased me into card making! She taught me many things related to our love of paper crafting but because of her and her illness I learned to show up. I learned to show up and not be afraid of the sick and dying.  I learned that God is in the driver's seat and I had better move over and let Him do the driving...which meant I had to trust Him with all things even with the death of Krista. I was recently reminded that "The best is yet to come!" I will see Krista again in Heaven and it will be the best! 

Today's card is in memory of Krista. I am using a stamp set from her collection that was gifted to me. The stamp set is called The Free and the Brave. It is since retired but I thought the name was appropriate for Krista and she, too, loved red, white and blue and all things Americana!


I am entering this card in this week's Paper Players challenge:


And the Retro Rubber challenge:


Happy Stamping!

Tracy


Tuesday, July 6, 2021

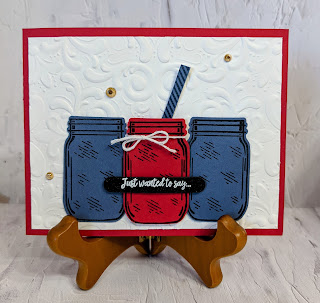
Jars in Red, White and Blue

 Tuesday, July 6, 2021

I could not resist! I had to make this card using the red, white and blue color combination.

I used the Jar of Flowers stamp set with the coordinating Jar Punch. A really fun and easy card to make!

Studio 1.15 Designs tutorial:

  • Real Red card base 4-1/4" x 11" scored at 5-1/2"
  • 4" x 5-1/4" Basic White emboss with the Parisian Flourish 3D embossing folder. Adhere to cardbase. 
  • Stamp two jars using Memento Black ink onto Misty Moonlight cardstock. Punch using Jar punch.
  • Stamp one jar using Memento Black ink onto Real Red cardstock. Punch using Jar punch.
  • Adhere red jar with dimensionals to the center of the paper. Adhere the other two jars with Tombow Multipurpose Glue.
  • My sentiment is from Many Messages embossed with white embossing powder and cut with the Messages die. Adhere with mini dimensionals.
  • Add three Gilded Gems
I am also entering this in The Krafty Chicks stamp act challenge this week. 
Happy Stamping!
Tracy


Saturday, July 3, 2021

Sweet Strawberries

 Saturday, July 3, 2021

Happy Saturday! I hope everyone's weekend is off to a great start! For those celebrating the 4th of July this weekend, have fun and be safe!

Today's card uses the Sweet Strawberry Bundle which includes the Sweet Strawberry stamp set and the Strawberry Builder punch.


I CASE'd (copy and selectively edit) this design from Stampin' Up's Annual Catalog (May 2021- April 2022) page 148. 

Studio 1.15 Tutorial:

  • Start with an A2 card base in Just Jade
  • Basic Black cardstock 4-1/4" x 5"
  • Stamp the flowers onto the DSP in Just Jade; adhere DSP to Basic Black piece
  • Stamp two strawberries using Poppy Parade. Outline is full strength, fill in is third generation; punch out
  • Stamp three leaves using Just Jade. Outline is full strength, fill in is third generation; punch out
  • Stamp three flowers. The outline is Just Jade and to fill in I used Daffodil Delight second generation
  • Stamp two stems for the strawberries using Just Jade. Outline is full strength, fill in with third generation. Adhere stems to strawberries using a glue dot.
  • Adhere strawberries to the DSP using dimensionals. Then add the the leaves and flowers.
  • Add a small Genial Gem to the punched out flowers.
  • For the sentiment I used the Many Messages stamp and stamped with Craft White ink onto Basic Black cardstock. Die cut using the Messages die.  I adhered the sentiment to the card with dimensionals.
Such a fun card for a summer birthday!
Happy Stamping!
Tracy

Thursday, July 1, 2021

Another Red, White and Blue Birthday!

 Thursday, July 1, 2021    

I have another birthday card in red, white and blue. This one uses the current SU! Sweet Ice Cream stamp set and the coordinating Ice Cream Builder punch. 


Such a fun and festive card! For those of you with July/August birthdays you may be seeing your card! Lol!

Studio 1.15 step-by-step tutorial:
  • Begin with an A2 Basic White card base
  • Cut a piece of Poppy Parade DSP  3/4" x  5"
  • Using the two largest Stitched So Sweetly dies cut one in Night of Navy and one in Basic White using the Stampin' Cut & Emboss Machine
  • Stamp 'You're So Cool' in Night of Navy onto the Basic White die cut
  • Using the Ice Cream Cone Builder punch, punch the ice cream cone out of Crumb Cake cardstock; stamp the cone stripes using Crumb Cake ink
  • Punch the ice cream scoops from Poppy Parade, Basic White and Night of Navy
  • Stamp the sprinkles using Versamark onto the Night of Navy ice cream scoop and emboss using gold embossing powder
  • Assemble your ice cream cone
  • Add 3 Gilded Gems to complete your card front
  • I stamped the 'Happy Birthday' sentiment in Night of Navy on the inside of the card
I hope you enjoyed this card and found some creative inspiration!

Happy Stamping!
Tracy